Article and Photos by Doreen Coyne, a member of the Richmond Hill Garden & Horticultural Society

Given the weather, you may be looking for a project that would be useful in your backyard. While at a friend’s cottage recently, I found a very useful modification for a picnic table that I knew would benefit many of us.
Jayne & Glen had two picnic tables and each had 2 wheels attached to the legs. You might wonder why Glen added them to the tables. The answer was that by lifting the picnic table from the opposite side you could wheel it around the backyard for mowing each week or just to rearrange them to form a better seating, or serving, placement. We’ve all pulled or pushed a picnic table around the backyard so we know that we can damage the legs of the table doing that. The addition of wheels extends the life of your picnic table.
So why is this a gardening tip? Because having a tea or meal in the garden is comforting allowing you to watch and enjoy your garden.
The photos of the picnic tables are below followed by directions for making this modification to your picnic table.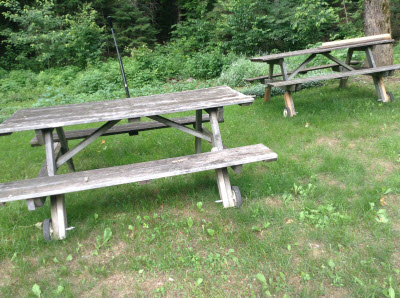
Things needed to add wheels to your picnic table:
• 2 wheels – try to locate two 6 inch or 8 inch diameter wheels from an old lawnmower, trolley cart, or the wheels from a child’s tricycle. You can purchase these wheels from the big box stores are well.
• 2 long bolts that are long enough to fit through both the central hole in your wheels and through your table leg. Bolts are likely required to be 3/8” and about 4” or 5” in length. Optionally you could use a long screw with a washer near the head but it may not hold as long as a bolt does.
• 4 washers
• 2 nuts
• A drill
Instructions:
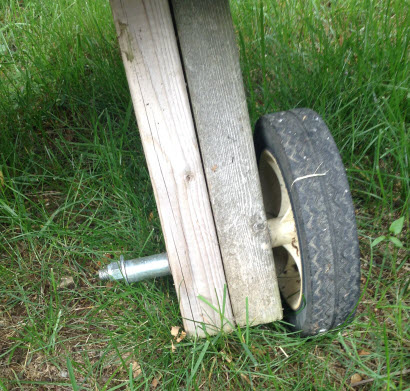
• Drill the hole for the bolt high enough up the leg of the table to allow about ¼” clearance for the wheel above the end of the leg. You’ll note in the picture that Glen added an additional piece of wood to the table leg. This was due to the age of the table and some decay in the existing leg. You shouldn’t need to add this extra wood but should you need to do it, then you will need longer bolts - about 6” or 7” in length.
• Put 1 washer on the bolt and push it through the hole you made. Add another washer on the end of the bolt beside the wood. Then tighten the bolt with the nut.
• Repeat this process to the second leg. Best to do to the long side legs (under the bench part) as it is easier to lift and move the table that way.
DONE!