Submitted by several members of the Richmond Hill Garden & Horticultural Society

Containers for seedlings – from Ingrid Sunar
- When buying some fruits, vegetables, muffins at the grocery store you'll get see-through closing containers. Some take out containers could also be used. Place a seed or two in several plant plugs (available at any Dollar store) then place the plant plugs in your opened container. Put some water in the container and close the lid for a self-watering unit.
- If you do not need a self watering container, use an egg carton and simply place your seeds in each egg space which you filled with soil.
- For a biodegradable container, plant your seeds in an edible ice cream cone filled with soil. The cones can be placed directly into the soil when it is time to plant outdoors.
- You could also fill toilet paper rolls filled with hot soil in which you place your seeds and store them in the takeout containers as well. Many plants would be fine if you cut the toilet paper roll into 2 cylinders for twice as many planting containers. A paper towel roll can provide 5 or 6 planting containers.
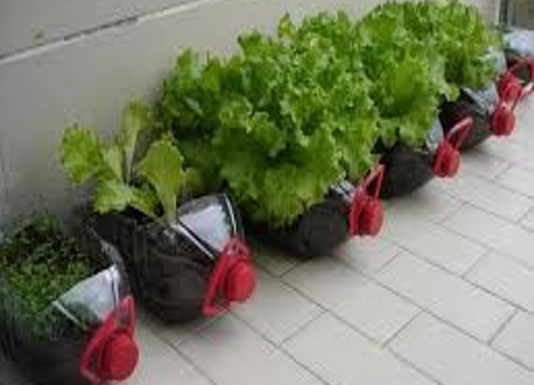
Growing flowers in jugs – from Ingrid Sunar
If you have a large jug with a handle you can cut a rectangular hole on the one side of the jug just behind the handle then down towards the end of the jug. Fill this with soil and then plant your seeds or small plants. Lay this on the opposite side on your patio, balcony, or porch. You'll have beautiful flowers or vegetables growing out of it shortly.
Growing Milkweed – from Jennifer Pyke
In early March, wrap the seeds in wet kleenex, place in a plastic bag, seal it and put in the freezer. In early April place the seeds on top of a pot of potting soil, press in, sprinkle more soil over them. Put in a sunny window. Harden off outside by gradually moving from shade to full sun, and plant out after any danger of frost."
Blossom End Rot
This occurs in many plants such as tomatoes, peppers, squash, and pumpkin. Blossom-end rot is caused by insufficient calcium in the tissue of the plan ex. A tomato. Blossom-end rot first appears as water- soaked spots on the blossom end, or bottom, of the tomato. The affected tissue breaks down rapidly and the area becomes sunken, dark brown or black, and leathery. This can happen at any time as the tomatoes mature, and most often on the first tomatoes of the season.
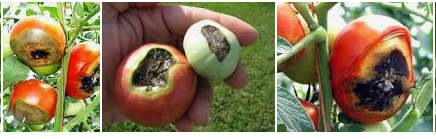
Photo credit: Michigan State University
- The first thought is that the soil may be calcium deficient. This is especially true if you use don’t enrich it. Members, Joe Celebre & Rahe Richards give this advice: During the winter months save clean eggshells. When planting tomatoes outdoors, put about quarter cup of crushed eggshells into the soil then add the seedling and cover with soil. You could also spread some around the seedlings. Egg shells have several benefits when growing vegetables. The egg shells provide the needed calcium, but also act as slug repellent, and help prevent end rot. Member Patty Carlson adds that she adds powdered milk to the soil where she plants tomatoes and peppers to help prevent “blossom end rot” which is caused by a lack of calcium in the soil. And of course, milk has a good amount of calcium. She also finds that dry conditions and insufficient moisture in the soil often bring it on.
- In a recent seminar we held, member Deb Coleman elaborated on end rot caused by insufficient moisture in the soil. If the soil has enough calcium, we look at the growing process. Conditions that cause blossom-end rot are closely linked to inconsistent soil moisture throughout the growing season. Since calcium is only moved into the plant with an ample moisture supply, when drought occurs the fruit continues to develop but will be affected by a calcium deficiency. Actively growing parts of the plant such as developing tomatoes must have a continuous supply of calcium to prevent these spots from developing.
- The third cause of end rot on tomatoes is root damage of the plants in the soil. This is because root damage can lead to decreased moisture intake. Cultivating too close to plants or burning them with fertilizer can reduce nutrient and water uptake through the roots. At the other end of the scale, waterlogged soils also interfere with the root’s ability to take up nutrients